|
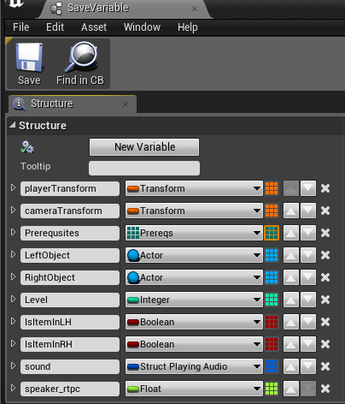
3/9/2017 0 Comments Serializer - Part 2Combine serializer with UI UI is one of the most important things for any kind of application. No matter how great your application is, there won't be many people who want to it if it doesn't provide proper UI which is easy to understand and easy to use. If your UIs are fancy, then that's even better. Thankfully, Unreal provides us a Motion Graphic UI Designer calls UMG which makes us possible to create HUD, menu, and any other interfaces based on GUI. At the core of UMG, there's a Widget. Widget is a series of pre-made functions that can be used to construct your interface. By utilizing Widget Blueprint, you will be able to construct your custom UI much faster than doing it by yourself. I'll skip about how to use Widget, but you can learn it by yourself from here. I'll just show you how to combine functionality of my serializer to the Widget. Step 1. Creating a Widget Blueprint and make your own palette This is my "Serial_Save" UI which is a part of my "Pause Menu" Widget. As you can see, Serial_Save is a vertical box type palette. It contains four Overlays and each of them has a Button(Save_slot#) with text(Save_slotText#). Overlays divide the area of a vertical box. So if you add them more, the area for each overlay will be reduced. For Buttons, you can add events based on your action(clicked, pressed, released, hovered, and unhovered). "Serial_Load" is pretty much same like this. Currently, I added 4 slots for both "Serial_Save" and "Serial_Load". I wish I would have known how to create a Widget dynamically so that I can show slider to control multiple slots based on how many slots can be seen at the same time. Since I haven't tried yet, I'm not sure if that's possible but I assume it is. 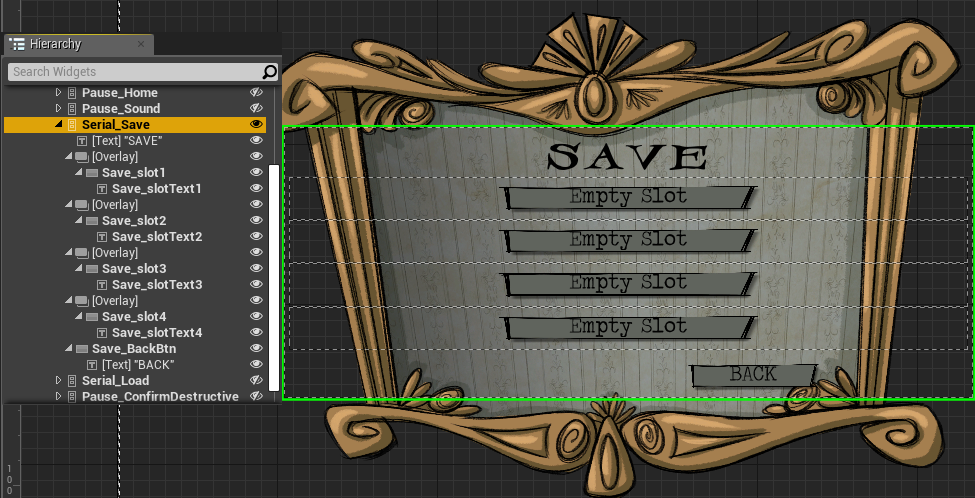 Step 2. Add proper functionality to the Event Graph or palette components you have added. This is a part of my Event Graph for "Serial_Save" UI. The first node in the left, OnClicked(Home_SaveBtn) node is a event node from "Pause_Home" UI. When I click a button says "Save", that button calls this event to hide "Pause_Home" UI and show "Serial_Save" UI. You can set the visibility of UI components by SetVisiblity function node. The default visibility for UI components is 'Visible.' So you should be aware of visibility and Z-Order if you don't want to see all UIs in your Widget together. After that, you can see there are four lists of nodes which do pretty much same thing but belonged to different buttons. When you click the slot, OnClicked(Save_slot#) event is triggered, set index for target save slot, IsSlotEmpty node checks if the selected slot, Save to Slot node calls Save function from the previous post to create a save file, and Update Save File List will update the list for saved files. Please remember the last part if you are not good at C++ based Unreal Development. Anyway, these two steps are basically all I did. Slightly different, but mostly same. Add UI components and set an appropriate functionality to them. 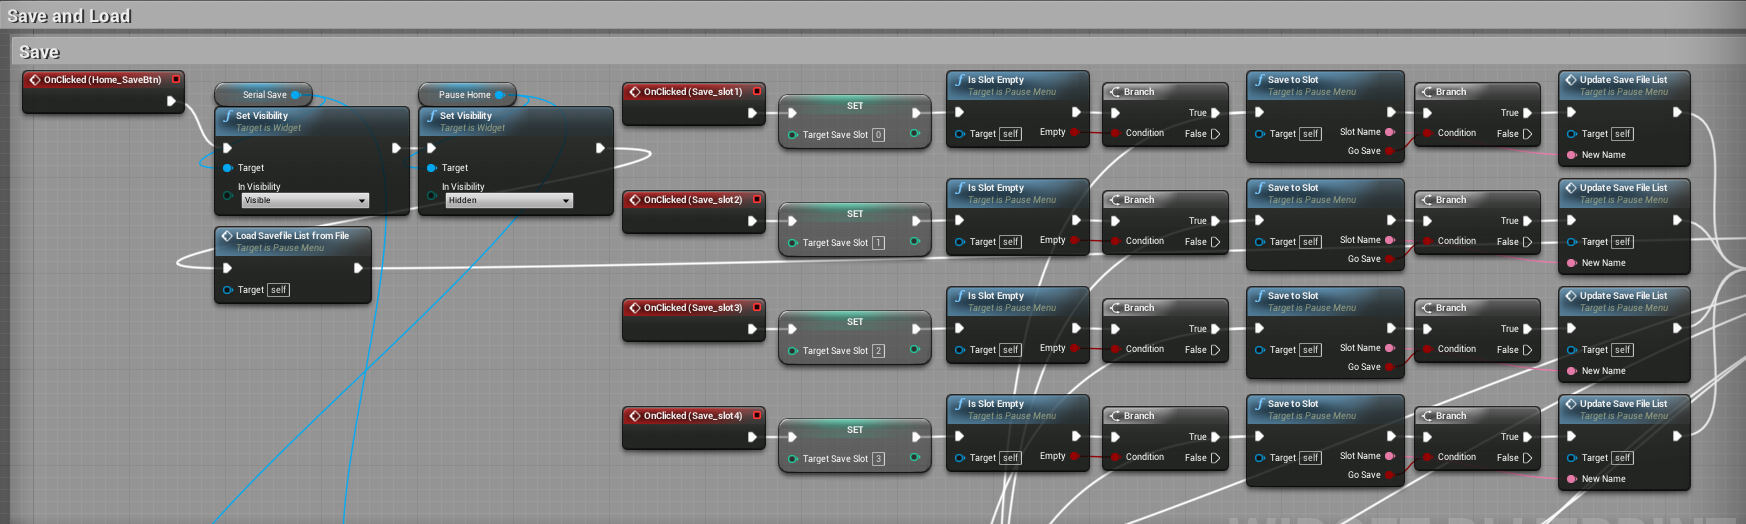 Now I think it is the time to tell you about the problem that Unreal Engine's blueprint based serialization has and trick to trespassing it. Unreal Engine does not allow us to access the driver in Blueprint level. I am currently using 4.12.5 version, so maybe this issue has been solved when you are reading this post. I hope so. But if you are good at C++, you can create your own serializer, or a blueprint function which can make it possible. The reason why this could be a problem is, I wasted several hours of mine because of this restriction. Like I said from the previous post, Unreal Engine's serializer only accepts string. You have to use string to serialize in or out your save file. Let me ask you, what if you need multiple save files with various name which can be serialized dynamically? Maybe you can serialize out(Save) successfully. Then how do you serialize them in(Load)? How does your application know what save files you have? When you are not able to access the driver? Before I notice this, I was thinking of storing save files to My Document folder. As a default setting, serialized files are saved in Project/Saved/SaveGames folder. You can create sub-folder inside here, but I don't know how to get out of this path. Even if I did, how can I get a save files' name list? My answer was creating another serializer which serializes the list of serialized files. I call this, the "Master Serializer". I know it's bit ugly. But trust me, as far as I know, this is the easiest and the simplest way of solution. Remember that I have a Update Save File List function node up there? That's the place I serialized the "Master Serializer". When I call functions which influence to the list, I call the Master Serializer either to update the list. Since there is only one instance for Master Serializer, you can set the name of Master Serializer's file as something like 'MasterSave', and call it for synchronizing the save file list. Thank you for reading! 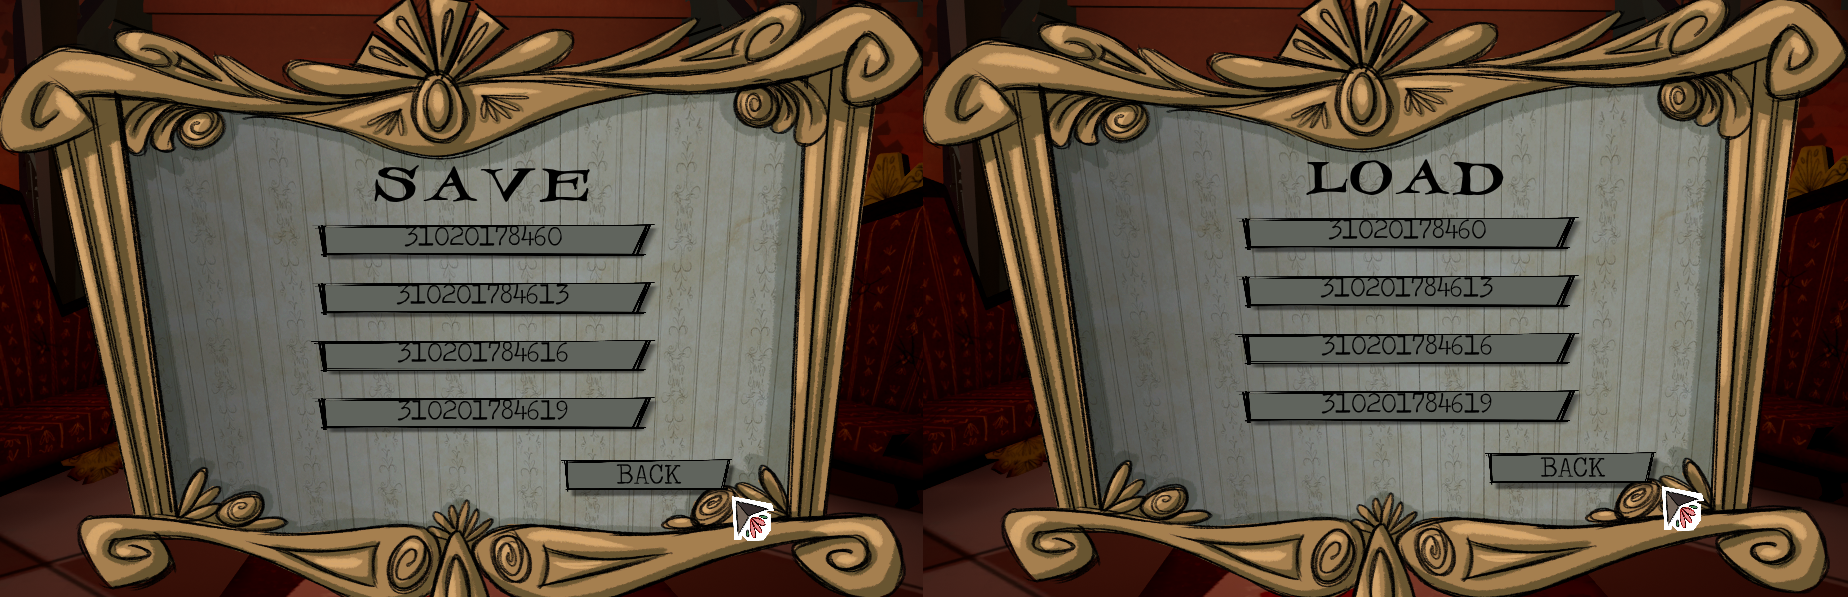 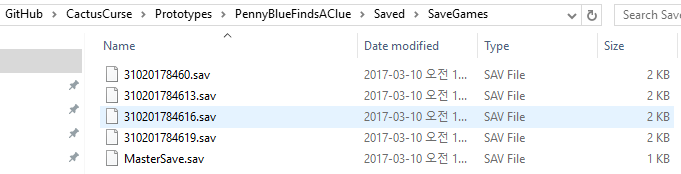
0 Comments
3/6/2017 0 Comments Serializer - Part 1Creating Serializer with Unreal Blueprint Saving and Loading the progress is one of the most common and essential part for almost every games. Status of the player character, transformation(position and direction), items in the pocket, skills you have, relationship with NPCs, and even game settings. Everything you need can be an element which should be serialized. Building a serializing system is not that difficult, but mostly time consuming task. Thankfully Unreal Engine provides serializing functionality for us. All we need to do is creating structure of what we need to serialize, and combine it with the game as pretty as possible. In this post, I am going to show you how do I implement the serializer from the game Penny Blue Finds A Clue.
Step 2. Create a your own SaveGame object which has the SaveVariable structure as its variable(SaveStruct) so that Unreal can serialize these elements. Let's call this blueprint object as PB_SaveGame. 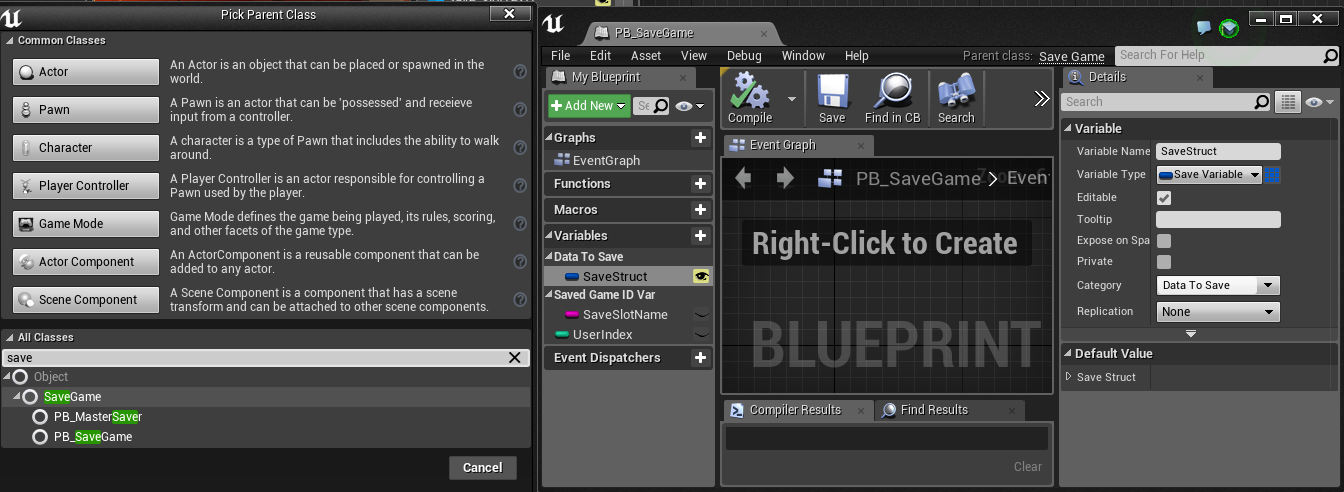 Step 3. Implement functions for serializing in and out. Aka, Save and Load. Here's how I did. Save 1) Check if the SaveGame object exists. If there isn't, create a new save object(PB_SaveGame type). The only way to do this is a string. If you have an object named as value of SlotName. (default path of this file is Project/Saved/SaveGames) 2) Create Save Game Object function node will return parent class(SaveGame) object after creation. Not PB_SaveGame object. So you need to cast it to store the value. 3) Then make new SaveVariable data with proper values you have 4) And call Save Game to Slot function to serialize out. 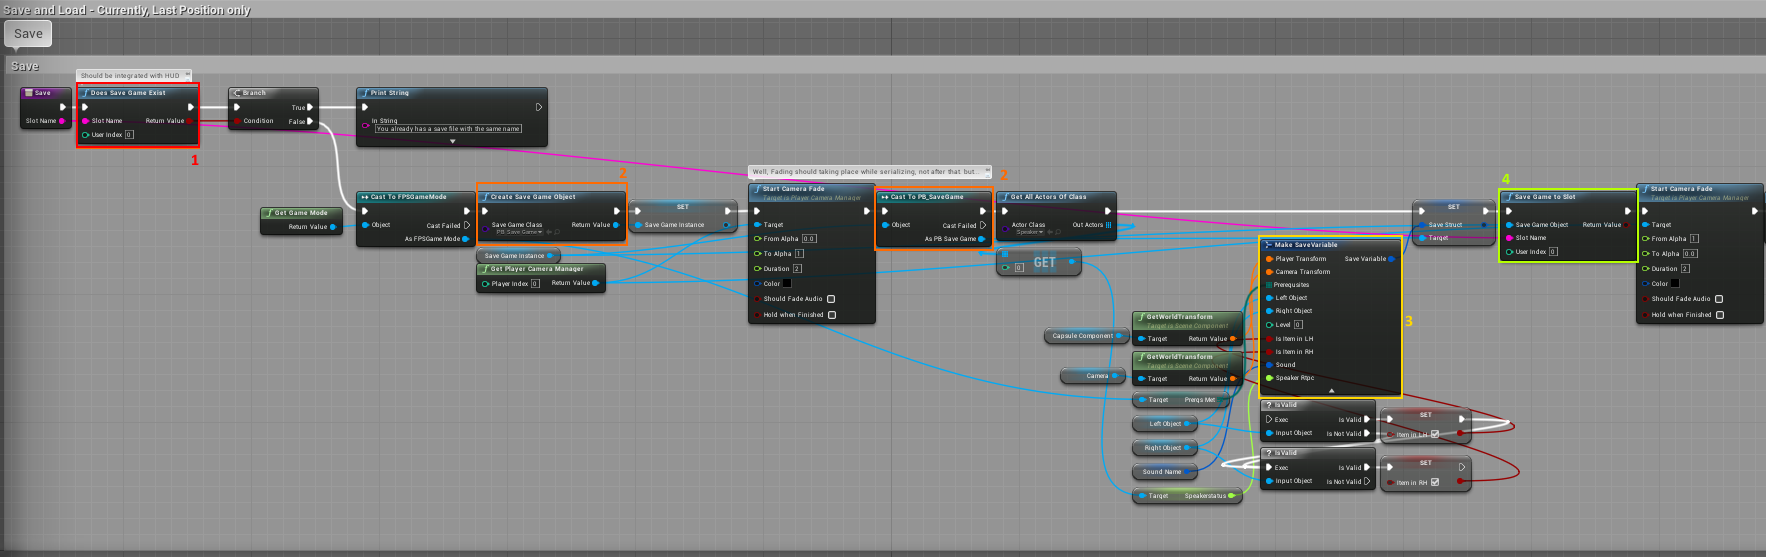 Load Loading is pretty much similar to Save, but reverse order. Serializing in the saved data(should use same string value as SlotName. if not, it will go wrong) with Load Game from Slot, break the SaveVariable into pieces and place them where they should be. 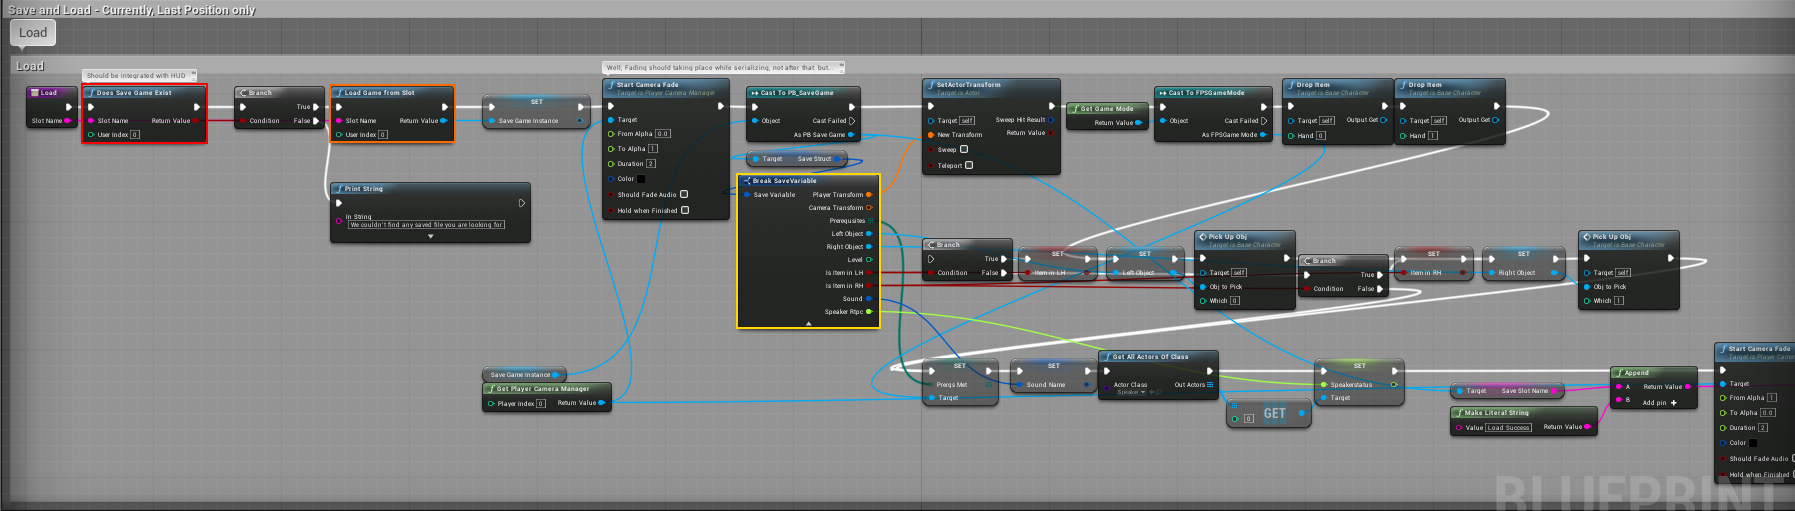 It's quite easy so far. Well, I added extra functionalities like camera fading while serializing, but you can skip that. But your serializer looks better with it. And also, checking if the save file exists(the one in the red box) is not mandatory either. You can skip that one too. From next post, I'll introduce Unreal Engine Widget, how to combine this serializer with UI, and also tell you some tips to trespassing a small obstacle this method has. If you are not familiar with Unreal, it might take a while to figure out. 3/5/2017 1 Comment Highlighted Outline MaterialPost processing outline material with highlighting 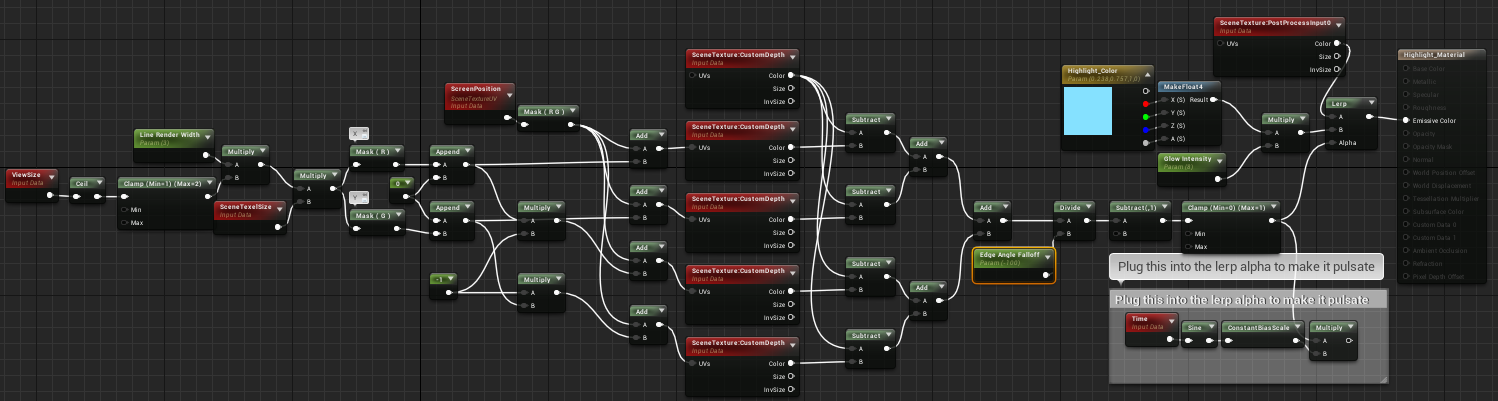 This is not the thing I made. It came from 4.9 Content Example pack of Unreal forum which is gone now. This post is for me to make sure I fully understood how it's working and help other beginners avoid unnecessary time wasting. Before starting There is a thing you need to know first. The "Custom Depth". Custom Depth is a new depth buffer that Unreal Engine 4 introduced with the PBR rendering system. It stores the depth of mesh objects. Not every objects in your view, but selectively. You can utilize this buffer for various purposes. 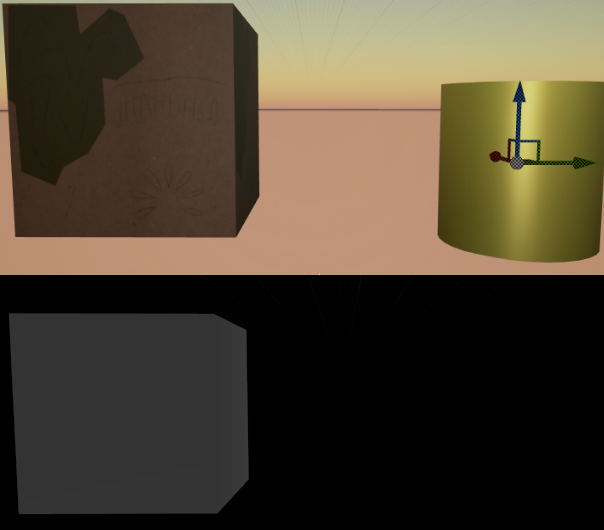 The image above is the result of Custom Depth buffer visualization. There are two objects. A box and a cylinder. I enabled Custom Depth only to the box. As you can see, there is only one depth image. A Box. Whether the object is static or skeletal, you can easily turn this functionality on and off by the check box under the Rendering category. 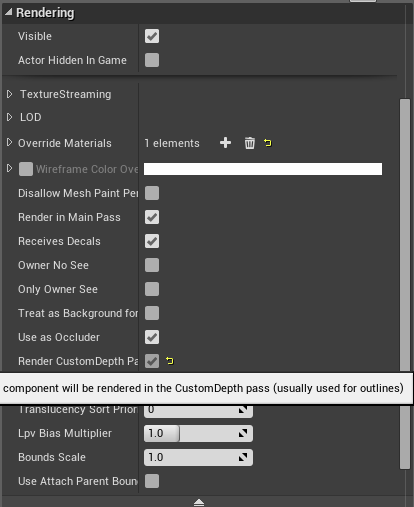 Implementation The reason why explained about Custom Render Depth buffer is it will be the main resource we need. The main idea of this technique is comparing two textures. One is the original custom depth texture, the other is custom depth texture with an offset value(width of the outline). Let's take a look at the first part. 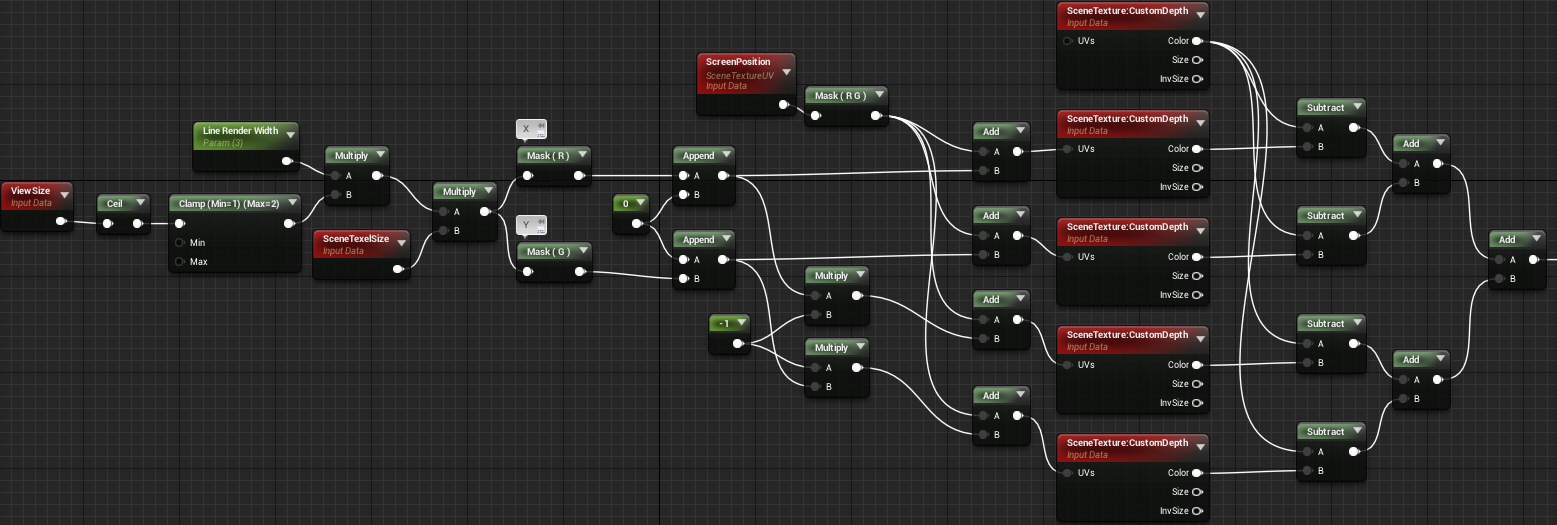 For each pixel, we need to perform 4 comparisons. One for each direction. Step 1. By multiplying size of the current view's pixel with the width of the outline, and multiplying it with SceneTexelSize, we can create the offset. Step 2. Masking R, G channels of the result of Step 1 and appending 0 will give us (offset, 0), (0, offset), (-offset, 0), and (0, -offset). Step 3. Adding the result of Step 2 from the ScenePosition UV(x,y) will give us (x+offset,0), (0, y+offset), (x-offset,0), and (0, y-offset). Step 4. By utilizing the result of Step 3 as UV of the custom depth texture, and subtracting them from original custom texture. If the pixel with the offset is itself, there will be no depth difference. At this point, we can determine if there should be an outline or shouldn't. Still, we have four textures separated in R, G channels Step 5. Adding separated textures of Step 4 into one will give us two textures (x+offset, y+offset) and (x-offset, y-offset). Step 6. Adding separated textures of Step 5 into one will give us one texture which is the area of pixels in between UV (x+offset, y+offset) and (x-offset, y-offset). 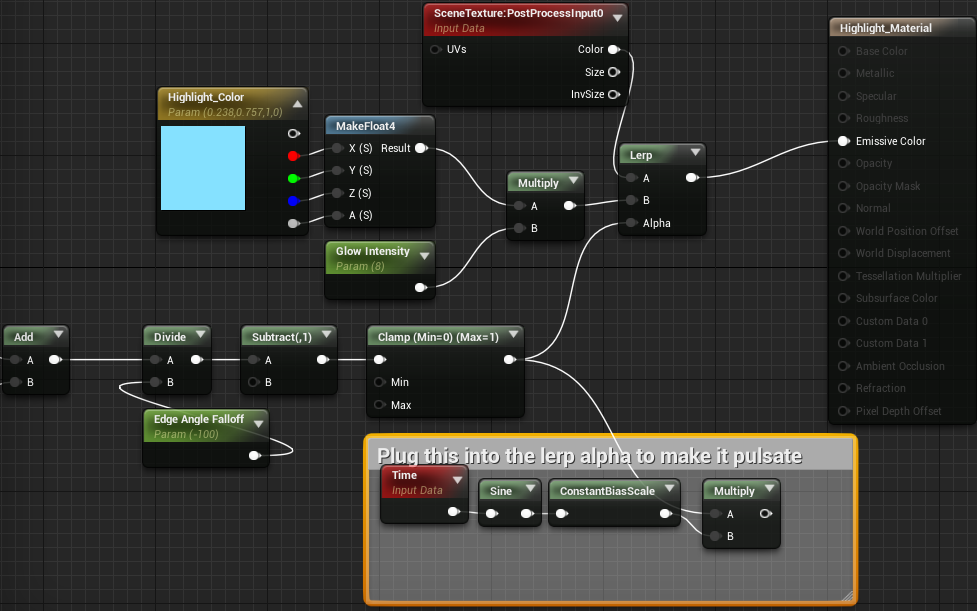 Step 7. By dividing it with negative value, subtracting 1 from it, and clamping to the value between 0 to 1, will give us alpha for the outline. Step 8. Since we got alpha, all we need to do is highlight this area with a certain color and an intensity for glowing. Then store this to the SceneTexture:PostProcessInput0(which was SceneTexture:SceneColor before) node. Final Result When your camera gets into the range of the post process volume, you will be able to see the outline. 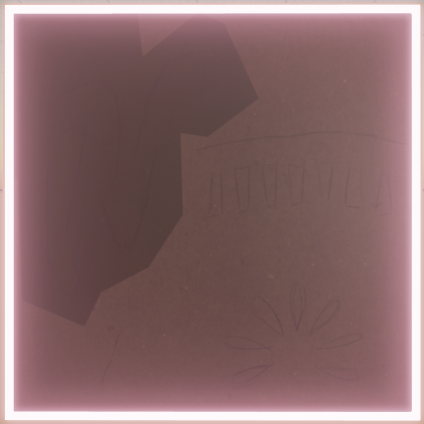 How to apply The thing you need to remind is this is the post processing effect. Which means, this material will be applied to the post process volume, not the object. 1. Place post process volume into the scene and create a material with Post Process domain. Only Emissive Color will be available. 2. Place mesh object with Render CustomDepth Pass on. 3. Apply the created material to the Post Process Volume 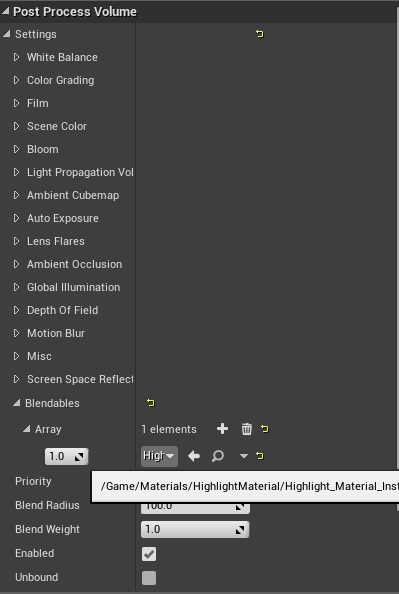 |